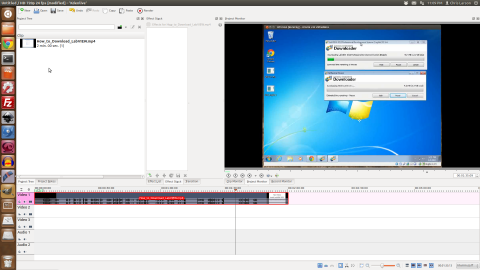
Getting started Screencasting with Linux and open source software was an adventure. I was looking for a single tool that could do all the editing for audio, video and effects. What I came up with is a combination of Kdenlive, Audacity, RecordMyDesktop, and a couple command line tools.
Challenging the status quo and empowering engineers
Putting them all together
I wrote about installing Drupal 7 on the Raspberry Pi and about installing node.js on the Raspberry Pi. Now I am writing about adding an Arduino. The Arduino will communicate with the Raspberry Pi over Ethernet. My setup uses an Arduino Uno with an Ethernet Shield. I imagine you could use any of the Ethernet capable Arduino variants as well.After successfully installing a LAMP stack and Drupal on my Raspberry Pi, I moved to the next step of installing node.js. Since the Whezzy image for Raspberry Pi is Debian Linux it was straight forward to install node.js. In fact I followed my own tutorial with the exception of installing npm.
For my birthday a good friend got me a Raspberry Pi. It took three months, but I finally received the raspberry pi in the mail this week. After spending time reading through performance reports on SD cards, I ordered the SanDisk Extreme Pro 8GB. Once it arrived I used my Ubuntu machine to download the Raspbian “wheezy” disk image and extract the image onto the SD card using ImageWritter. Using an iPhone USB charger I plugged in a micro USB cable to the power input on the Raspberry Pi board as well as an HDMI monitor and wireless keyboard/mouse dongle.
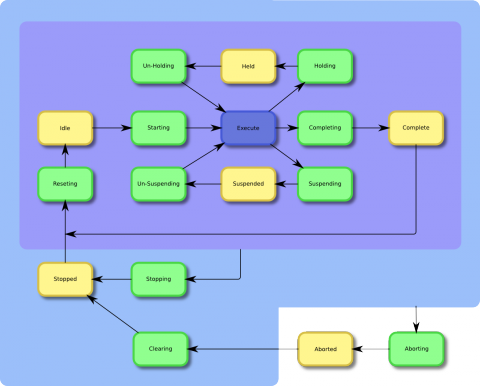
I created a PackML flowchart for a presentation and decided to post it for anyone to use in their presentations. PackML is a great method for controlling the starting, stopping, aborting and recovery of any machine.
A simple processing.js animation.
[processing]
// Global variables
float radius = 50.0;
int X, Y;
int nX, nY;
int delay = 16;
void setup(){
size( 600, 320 );
strokeWeight( 3 );
frameRate( 15 );
X = width / 2;
Y = height / 2;
nX = X;
nY = Y;
gear = loadImage("/sites/default/files/styles/large/public/gear2.png");
belt = loadImage("/sites/default/files/styles/large/public/belt.png");
}
//Variables
float angle;
float cosine;
PImage gear;
PImage belt;
void draw(){
background(102);
radius = radius + sin( frameCount / 4 );
// Track circle to new destination
As part of my Open Source Factory Monitoring setup I have a MySQL database that is populated by a node.js script. The display of the data will be in Drupal using Highcharts. (note that Highcharts is not open source and will require a license for commercial applications.) After evaluating several graphing packages I decided to use Highcharts because it is beautiful and works well for large data sets.
As part of my Open Source Factory Production monitoring, I setup an Arduino to collect analog data and send it to a node.js server. The Arduino sketch takes advantage of the DNS lookup ability in the Ethernet.h library and the DHCP IP address assignment. My goal for this sketch was to make it as easy as possible to use an Arduino for data collection. The sketch takes care of assigning an IP address that is compatible with the network. It then uses DNS lookup to find the IP address of my server. If the network is not configured for DNS lookup it defaults to a known IP address.
I combined a bunch of open source technologies into a system that monitors production in a factory. The technologies include Ubuntu, Arduino, node.js, MySQL and Drupal. Ubuntu takes care of the server and LAMP stack. Arduino collects the data directly from the production machines. Node.js handles the communication between the Ethernet shield on the Arduino and the Ubuntu server. MySQL receives the data from node.js and stores it for display and analysis. Last but not least, Drupal handles the display and distribution of the manufacturing data.
For content that is not sensitive tokens can be used to create unique feeds that each user can subscribe to. In my particular case I wanted to create an RSS feed for each user that only included content they had authored. To accomplish this I installed the Token Authentication module and the Token Filter module. These two modules have similar names, but the Token Authentication module does not relate to the rest of the Drupal Token modules.